
How to Re-Pressurise your Boiler Using a Rigid Filling Loop
If your central heating system is not as efficient as it once was, then this could be a sign that your boiler needs to be re-pressurised. Open the front panel on your boiler and check the pressure gage. If it reads below 1 then follow our step by step guide below that walks you through how to re-pressurise your boiler back to the safe level of between 1 and 1.5. The pressure in your heating system could drop due to many reasons, but it is likely that there may be a small hole in your system pipes. This is not a problem and re-pressuring your boiler will bring the efficiency back to normal. This is something that the homeowner can carry out easily, but if you do not feel confident following the steps below it is advisable to arrange for a local plumber to carry out this task. Our friends at Baxi have a step by step guide video below that shows you in real time how easy it is to carry out the maintenance.
Step 1
Look at the boiler from underneath you will see two silver taps with black knobs and end caps at each end. You will need to unscrew both of these end caps. If you are unable to remove them with your hands, then use a spanner and gently remove them from the boiler. Your installer should have left a shirt ridged pipe with rubber washers on each end with you for safe keeping. If not you can purchase a new one from our range. This is the filling loop that you will need to help re-pressurise the boiler. It is important to note that without the rubber washers it is not possible to use the filler loop and you will need to contact a local plumber using our installer database.
Step 2
You now need to connect the filling loop between the two taps and screw on the wing nut leaving it a little loose. Now screw the second wing nut until hand tight and go back to the first one and tighten it up
Step 3
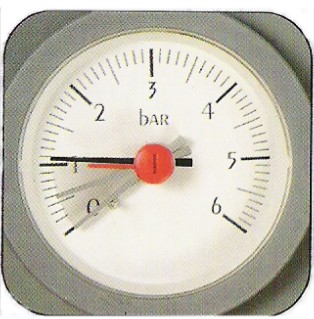
Open the first black tap or the one of the left fully. On the front of your boiler you will need to pull down the front panel and locate the pressure gage which is the round clock with ‘bar’ written on the front. You will need to slowly open the second tap and you will hear the sound of water running and the pressure gage in the panel will start to rise.
Step 4
When you reach the 1 bar of pressure as shown in the diagram below you will need to fully close the second tap (on the right) and then fully close the second tap (on the left).
Note - If your boiler pressure is between 1 to 1.5 bar then all is fine. If you see a pressure in excess of 2.5 bar then you will need to contact a local plumber using our installer database as soon as possible
Step 5
Unscrew both wing nuts on the filler loop and pull the filler loop away from the boiler taps. It would be wise to have something underneath to catch the water that will drip from the loop.
Step 6
Replace both of the end caps on the taps and tighten well.